Ever since Windows 3.1, Microsoft included the Windows Help program (WinHlp32.exe) with new releases. WinHlp32.exe is used to view 32-bit Help files that have the .hlp file name extension.
Starting with the release of Windows Vista and Windows Server 2008, Microsoft has decided to no longer include in WinHlp32.exe as a component of the Windows operating system. To be able to read these files you must install the Windows Help program (WinHlp32.exe) for Windows Vista and Windows Server 2008 manually.
This was done supposedly due to security reasons and according to MS does not meet the standards for current Microsoft bloatwa.. I mean software.
Here is a brief description of the file directly from the MS Downloads site:
"WinHlp32.exe is required to display 32-bit Help files that have the ".hlp" file name extension. To view .hlp files on Windows Vista, you need to install this application."
The link provided above should get you to the file if not try here. You will have to authenticate your installation of Windows through the Windows Genuine Advantage program. If you use Internet Explorer it should zoom right through it, but if you use another application like FireFox then you might have to download the WGA plug in for it.
After you jump through the WGA hoop you will be able to download two versions of the file... Choose which one is right for you:
Windows6.0-KB917607-x64.msu coming in at 611 KB (Vista, S2008 64-bit)
or
Windows6.0-KB917607-x86.msu coming in at 601 KB (Vista, S2008 32-bit)
Once you choose your download and run the program just follow the "I accept" prompts and then the Finish Button. It will install to the default location for MS software.
If you would like more in depth information about this file please check the KB (knowledge base) article #917607 directly from Microsoft.
Thursday, January 15, 2009

Sunday, January 11, 2009
Cannot Edit the Registry
Sometimes when a virus infects a computer it will over write the settings to allow for a user to edit the registry.
When you go to Start > Run > Regedit you will recieve and error stating:
"Registry editing has been disabled by your administrator"
This is very frustrating especially when you are doing tasks under the administrator account.
Before you begin the work around for this I recommend unplugging the computer from the network so that it does not have an internet connection. I had this policy overwritten after it was changed because the virus was reactivated via internet communication. It gets very frustrating.
Method 1:
For Windows XP machines go to Start > Run > gpedit.msc
This will bring up the Group Policy Editing MMC snap in console. Here you will have to drill down to:
User Configuration > Administrative Templates > System
Look on the left side panel and scroll down until you see:
Prevent access to registry editing tools
Double click it and set it as Not Configured. OK your way out of the set up and Log Off or Restart the computer.
Method 2:
A much easier way to do this, is to run a Visual Basic Script that Doug Knox a MVP for Microsoft created. This script will give you the ability to enable or disable the Registry Editor function on a Windows machine. If you are using Vista you may want to right click the file and run it as Administrator.
Download the .vbs script from here.... It's the regtools.vbs script in the upper right hand corner. Double click it to start the auto run sequence. Click the OK's then reboot your computer. Logging off will not help you very much at this point so make sure you reboot.
I had to do all of this when a virus overwrote the ability to see hidden files and folders.
It was a mess, but that is for another day.
JS
When you go to Start > Run > Regedit you will recieve and error stating:
"Registry editing has been disabled by your administrator"
This is very frustrating especially when you are doing tasks under the administrator account.
Before you begin the work around for this I recommend unplugging the computer from the network so that it does not have an internet connection. I had this policy overwritten after it was changed because the virus was reactivated via internet communication. It gets very frustrating.
Method 1:
For Windows XP machines go to Start > Run > gpedit.msc
This will bring up the Group Policy Editing MMC snap in console. Here you will have to drill down to:
User Configuration > Administrative Templates > System
Look on the left side panel and scroll down until you see:
Prevent access to registry editing tools
Double click it and set it as Not Configured. OK your way out of the set up and Log Off or Restart the computer.
Method 2:
A much easier way to do this, is to run a Visual Basic Script that Doug Knox a MVP for Microsoft created. This script will give you the ability to enable or disable the Registry Editor function on a Windows machine. If you are using Vista you may want to right click the file and run it as Administrator.
Download the .vbs script from here.... It's the regtools.vbs script in the upper right hand corner. Double click it to start the auto run sequence. Click the OK's then reboot your computer. Logging off will not help you very much at this point so make sure you reboot.
I had to do all of this when a virus overwrote the ability to see hidden files and folders.
It was a mess, but that is for another day.
JS
Sunday, January 4, 2009
Increase the size of Text Inbox on Cell Phone
This is for a Alltel Samsung type cell phone.
******* WARNING *******
I AM NOT RESPONSIBLE FOR THE DESTRUCTION OF YOUR PERSONAL PROPERTY. DO THIS AT YOUR OWN RISK.
There are codes that you can type into any cell phone and you will be able to make modifications to the cell phone in simple ways.
One modification you can make to the phone is the amount of space you can have to store Text Messages (SMS).
To do this on the phone described above type this into your phone. It may or may not work depending on your cell phone and carrier.
##3282# == ##data#
This will open up a data menu. In this menu you can view or edit the settings. Here you can see the SMS settings.
Scroll to the SMS selection and press OK button. Choose Edit and enter your SPC code. Most phones are six zero's = 000000 = Not all though. Here you will have another set of options to choose.
Pick the SMS MO SO option and here you will see 8K and 13K. This is the allowed size of your SMS inbox. Change the settings to 13K. Click OK, Back, Done then Exit. You now have increased your Text Inbox size for storage 5K.
There are a ton more things you can do with a couple pieces of free software and and a great place to start is at Howard Forums. Here you will find all kind of like minded people that have an peculiar interest in how to get more for their money when it comes to their Cell Phone.
JS
******* WARNING *******
I AM NOT RESPONSIBLE FOR THE DESTRUCTION OF YOUR PERSONAL PROPERTY. DO THIS AT YOUR OWN RISK.
There are codes that you can type into any cell phone and you will be able to make modifications to the cell phone in simple ways.
One modification you can make to the phone is the amount of space you can have to store Text Messages (SMS).
To do this on the phone described above type this into your phone. It may or may not work depending on your cell phone and carrier.
##3282# == ##data#
This will open up a data menu. In this menu you can view or edit the settings. Here you can see the SMS settings.
Scroll to the SMS selection and press OK button. Choose Edit and enter your SPC code. Most phones are six zero's = 000000 = Not all though. Here you will have another set of options to choose.
Pick the SMS MO SO option and here you will see 8K and 13K. This is the allowed size of your SMS inbox. Change the settings to 13K. Click OK, Back, Done then Exit. You now have increased your Text Inbox size for storage 5K.
There are a ton more things you can do with a couple pieces of free software and and a great place to start is at Howard Forums. Here you will find all kind of like minded people that have an peculiar interest in how to get more for their money when it comes to their Cell Phone.
JS
Sunday, December 28, 2008
Vonage and DSL connections
If you have a Vonage system and you use DSL internet connection and you want multiple phones to work you run into problems with inside/outside wiring.
If you just have one phone that you want connected to Vonage then everything will work out fine. Its when you plug the Vonage Router via the Telephone cable into the phone jack/biscuit you get a busy signal from the phone.
This is because with voltage running through the pair your Vonage system will send a busy signal to the tele set.
To fix this you need to send the voltage through a separate pair on the jack and have the rest of the house set to the other set.
WARNING: NID's come in all shape and sizes. It would be best to research the particular NID you are working on before continuing. Most telephone companies use Red,Green,Black,Yellow wires for working pair. This is not a hard set rule and may be different in your area. I take no responsibility for any injury you may sustain or device's you may break in the process.
For simplicity sake I will use the Red and Green pair as the current pair in use with Black and Yellow as the second pair. The pictures I'll use are random ones I've gotten from the Internet.
On the NID outside the building you will see Red and Green attached to the NID Posts. This picture uses the Red and Blue wires for a live connection.
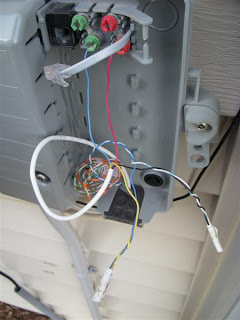
Looking at this picture you see that Black is twisted to White and Yellow is twisted to Green. The Black and Yellow are the colors from the Telephone company the Green and White is from the installation cable.
The first thing to do is remove the live connection from the NID posts. Unplug the RJ11 connection as the picture shows. I like to mark my wires with masking tape just for reference, because you never know what can come up while your working these. Untwist the ground pair (Yellow, Black) mark them and let hang.
You will now connect the Red and Green that was originally connected to the NID posts to the pair that the Yellow and Black were originally on. Basically just switching the wiring connections.
I recommend using Scotchlok's from 3M to connect your wires instead of twisting them together, but if your in a pinch ~ twist and cap the connections.
Here is a link to Digikey to purchase Scotchloks.
You now should have a Black and Yellow pair to connect. Wrap those on the NID posts the Red and Green were on and head back inside to your wall jack.
At the wall jack you need to remove the Red and Green pair and place the Black and Yellow pair on. So if Red and Green are on the 1 and 2 connects place the Black and Yellow pair on the 1 and 2 and the Red and Green on the 3 and 4.
You now have electricity going to that jack from the NID on the Black and Yellow pair. You can plug in your DSL connection. Turn on the Modem and get sync. This will allow you to get an Internet connection for your Vonage system and computer. You can test this by plugging in a phone to the jack and you should get a busy signal.
All the other phones in the house will be on the Red and Green pair and have no electricity going to them. So when you pick up another phone in the house you will hear no busy signal or dial tone just yourself breathing into the phone.
This is where you must make a decision. You can either run a telephone cable to a non charged outlet or you can wire up a dual jack wall plate.
Here is a crappy picture of the reverse side of a dual jack plate.
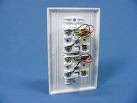 I prefer the dual jack method. This way you have a live DSL connection and a dead Vonage connection all in one spot.
To do it just connect the Red and Green pair to the 1 and 2 connects on the plate back. just as all the others in the house were/are. All wall plates are wire color coded to make things simpler.
I can only recommend that you test continuity with a tone tester or at least a voltmeter before you plug your phone in. Also make sure you close up your NID box outside to protect if from the weather once you are finished.
This may seem confusing while reading it, but once you get into it you will see very quickly what is going on. You are just taking voltage from one set of wires and putting it on another then ending that connection on the other end.
I've run into problems with older house wiring that this will just not work due to other IW issues. I cannot stress enough that color scheme and NID types vary all across the world and this blog post is by no means an end all solution to the DSL Vonage problems. If you continue to have problems you can also check on the Vonage forums.
JS
If you just have one phone that you want connected to Vonage then everything will work out fine. Its when you plug the Vonage Router via the Telephone cable into the phone jack/biscuit you get a busy signal from the phone.
This is because with voltage running through the pair your Vonage system will send a busy signal to the tele set.
To fix this you need to send the voltage through a separate pair on the jack and have the rest of the house set to the other set.
WARNING: NID's come in all shape and sizes. It would be best to research the particular NID you are working on before continuing. Most telephone companies use Red,Green,Black,Yellow wires for working pair. This is not a hard set rule and may be different in your area. I take no responsibility for any injury you may sustain or device's you may break in the process.
For simplicity sake I will use the Red and Green pair as the current pair in use with Black and Yellow as the second pair. The pictures I'll use are random ones I've gotten from the Internet.
On the NID outside the building you will see Red and Green attached to the NID Posts. This picture uses the Red and Blue wires for a live connection.

Looking at this picture you see that Black is twisted to White and Yellow is twisted to Green. The Black and Yellow are the colors from the Telephone company the Green and White is from the installation cable.
The first thing to do is remove the live connection from the NID posts. Unplug the RJ11 connection as the picture shows. I like to mark my wires with masking tape just for reference, because you never know what can come up while your working these. Untwist the ground pair (Yellow, Black) mark them and let hang.
You will now connect the Red and Green that was originally connected to the NID posts to the pair that the Yellow and Black were originally on. Basically just switching the wiring connections.
I recommend using Scotchlok's from 3M to connect your wires instead of twisting them together, but if your in a pinch ~ twist and cap the connections.

Here is a link to Digikey to purchase Scotchloks.
You now should have a Black and Yellow pair to connect. Wrap those on the NID posts the Red and Green were on and head back inside to your wall jack.
At the wall jack you need to remove the Red and Green pair and place the Black and Yellow pair on. So if Red and Green are on the 1 and 2 connects place the Black and Yellow pair on the 1 and 2 and the Red and Green on the 3 and 4.
You now have electricity going to that jack from the NID on the Black and Yellow pair. You can plug in your DSL connection. Turn on the Modem and get sync. This will allow you to get an Internet connection for your Vonage system and computer. You can test this by plugging in a phone to the jack and you should get a busy signal.
All the other phones in the house will be on the Red and Green pair and have no electricity going to them. So when you pick up another phone in the house you will hear no busy signal or dial tone just yourself breathing into the phone.
This is where you must make a decision. You can either run a telephone cable to a non charged outlet or you can wire up a dual jack wall plate.
Here is a crappy picture of the reverse side of a dual jack plate.
 I prefer the dual jack method. This way you have a live DSL connection and a dead Vonage connection all in one spot.
To do it just connect the Red and Green pair to the 1 and 2 connects on the plate back. just as all the others in the house were/are. All wall plates are wire color coded to make things simpler.
I can only recommend that you test continuity with a tone tester or at least a voltmeter before you plug your phone in. Also make sure you close up your NID box outside to protect if from the weather once you are finished.
This may seem confusing while reading it, but once you get into it you will see very quickly what is going on. You are just taking voltage from one set of wires and putting it on another then ending that connection on the other end.
I've run into problems with older house wiring that this will just not work due to other IW issues. I cannot stress enough that color scheme and NID types vary all across the world and this blog post is by no means an end all solution to the DSL Vonage problems. If you continue to have problems you can also check on the Vonage forums.
JS
Wednesday, December 17, 2008
Telnet in Vista
What happened to Telnet on the Vista OS?????
Telnet is a great application for basic remote administration of computers. Sadly in Vista though it is turned OFF by default. This only adds to the frustration that is the Vista Albatross.
To turn it on you have to get to Programs and Features in the Vista complex. To get here do this:
Start Pearl > Control Panel > Programs and Features > Turn Windows features on and off (Left Hand Side of Window on bottom) > Telnet Client
Enable it by placing a check mark beside it and click OK and/or Close X all the way out to the desktop. Now go to the Run command and type in telnet.
A telnet session will open allowing you to connect to a remote host device.
Frustrating at first, but easy to remedy in the end...
JS
Telnet is a great application for basic remote administration of computers. Sadly in Vista though it is turned OFF by default. This only adds to the frustration that is the Vista Albatross.
To turn it on you have to get to Programs and Features in the Vista complex. To get here do this:
Start Pearl > Control Panel > Programs and Features > Turn Windows features on and off (Left Hand Side of Window on bottom) > Telnet Client
Enable it by placing a check mark beside it and click OK and/or Close X all the way out to the desktop. Now go to the Run command and type in telnet.
A telnet session will open allowing you to connect to a remote host device.
Frustrating at first, but easy to remedy in the end...
JS
Wednesday, December 10, 2008
HyperTerminal Alternatives
When consoling into a router you have generally use some type of program to view the internals of the router. For Cisco routers I used to use Hyperterminal. It is a free program and is included on all Windows OS pre Vista.
You can find it under the Programs || Accessories || Communications || Hyperterminal
If you would like Hyperterminal on your Vista OS you can still get HyperTerminal from Hilgraeve, the company that created it, but you will have to purchase the Personal Edition. Link Here
One thing comes to mind when thinking about Hyperterminal. That is the burning, dizzying sensation I get from looking at black on white text for over two hours.
As great as Hyperterminal is or was there are alternatives out there for the Windows and Linux systems.
Tera Term:
This product was created in 1996 by T. Teranishl for the Windows 3.1/95/NT/ it supported Telnet, SSH and serial port connections. The new version picked up where the older one left off and is still free with a ton of extended options.
You can customize Tera Term to look how you would like. I prefer the Green text on Black background ala the Matrix code.
Real Term:
For Linux I prefer Real Term. It looks a lot like a tty connection, but has a GUI at the bottom of the screen that allows for serious configuration and testing. It can be used for far more serious stuff than just a simple COM connection. I have never used it though for anything more than a tool to get into a Cisco router.
These are just two products from many that are out there that I prefer. I am sure there are better tools out there so do a web check and see what you can find and let me know.
JS
You can find it under the Programs || Accessories || Communications || Hyperterminal
If you would like Hyperterminal on your Vista OS you can still get HyperTerminal from Hilgraeve, the company that created it, but you will have to purchase the Personal Edition. Link Here
One thing comes to mind when thinking about Hyperterminal. That is the burning, dizzying sensation I get from looking at black on white text for over two hours.
As great as Hyperterminal is or was there are alternatives out there for the Windows and Linux systems.
Tera Term:
This product was created in 1996 by T. Teranishl for the Windows 3.1/95/NT/ it supported Telnet, SSH and serial port connections. The new version picked up where the older one left off and is still free with a ton of extended options.
You can customize Tera Term to look how you would like. I prefer the Green text on Black background ala the Matrix code.
Real Term:
For Linux I prefer Real Term. It looks a lot like a tty connection, but has a GUI at the bottom of the screen that allows for serious configuration and testing. It can be used for far more serious stuff than just a simple COM connection. I have never used it though for anything more than a tool to get into a Cisco router.
These are just two products from many that are out there that I prefer. I am sure there are better tools out there so do a web check and see what you can find and let me know.
JS
Monday, December 8, 2008
Making your own Butt Set
My beautiful Butt Set broke on me while on site one day and I had to make one on the fly to get the job done this is what I did....
To make your own Butt Set, Linemans Headset, or Beige Box you will need:
A land line phone (not a cordless phone)
Two alligator clips
Soldering Iron and Solder
Scissors or wire cutters
Remove the cord from both ends of the phone.
I prefer to use the straight cord with the RJ11's and not the curly cord with RJ11's. It just gets all tangled and creates an unruly mess.
Cut one end of the cord and peel back the vinyl/plastic coating exposing the wires bare with the scissors or wire cutters.
Split open the wire end/open end of the alligator clips so you will have room to drop solder onto the wires and have a clear view of what you are doing. Scrap the open end of the clip with your Scissors to remove any coatings that are put on the clip at the manufacture leaving bare metal to bare metal connection between the wire and clip.
Place the Green wire onto the end of the alligator clip and drop a little bit of solder on it making a clean connection. Let it cool.... Be careful the clip connection is delicate and can break easily.
Now do the same with the Red wire.
Color code is not really an issue just use two wires from the cord and solder them onto the alligator clips. I try to keep them color coordinated for detail and simplicity. These will be connected to the posts later for call outs.
Now that the clips have been added to the wires plug the other end into the phone set. Make sure the phone is on Tone not Pulse.
You now have a working Butt Set and to test it you can either go to a 66/100 block, open up your phone Biscuit or go to a NID splitter and connect the one clip to one post and the other clip to the other post and make calls.
I didn't go into great detail or add pictures to this because Butt Sets can be used illegally. If you have any type of Telco experience you will understand this tutorial without any further explanation.
To make your own Butt Set, Linemans Headset, or Beige Box you will need:
A land line phone (not a cordless phone)
Two alligator clips
Soldering Iron and Solder
Scissors or wire cutters
Remove the cord from both ends of the phone.
I prefer to use the straight cord with the RJ11's and not the curly cord with RJ11's. It just gets all tangled and creates an unruly mess.
Cut one end of the cord and peel back the vinyl/plastic coating exposing the wires bare with the scissors or wire cutters.
Split open the wire end/open end of the alligator clips so you will have room to drop solder onto the wires and have a clear view of what you are doing. Scrap the open end of the clip with your Scissors to remove any coatings that are put on the clip at the manufacture leaving bare metal to bare metal connection between the wire and clip.
Place the Green wire onto the end of the alligator clip and drop a little bit of solder on it making a clean connection. Let it cool.... Be careful the clip connection is delicate and can break easily.
Now do the same with the Red wire.
Color code is not really an issue just use two wires from the cord and solder them onto the alligator clips. I try to keep them color coordinated for detail and simplicity. These will be connected to the posts later for call outs.
Now that the clips have been added to the wires plug the other end into the phone set. Make sure the phone is on Tone not Pulse.
You now have a working Butt Set and to test it you can either go to a 66/100 block, open up your phone Biscuit or go to a NID splitter and connect the one clip to one post and the other clip to the other post and make calls.
I didn't go into great detail or add pictures to this because Butt Sets can be used illegally. If you have any type of Telco experience you will understand this tutorial without any further explanation.
Subscribe to:
Posts (Atom)

 Posts

